Table of Contents:
-
Installation ↑ top
Installing your theme is easy! After downloading you should have a xmag-plus.zip file.
– WordPress Method
1. Go to Appearance » Themes in the WordPress Dashboard and click on the “Add New” button
2. Click on the “Upload link”, select the xmag-plus.zip file and click “Install Now”
3. Activate the theme– Ftp Method
1. Log into your site via FTP
2. Browse to your folder located at wp-content/themes
3. Unzip the xmag-plus.zip folder and upload xMag Plus folder to your server
4. Log In to WordPress and go to Appearance » Themes
5. Find the theme and click to activate -
Automatic Update ↑ top
If your theme is out of date, you will see a notice on your WordPress Dashboard. You’ll be able to update your theme using the traditional WordPress update tools.
You will get update notifications only if you have an active Theme License. Here you find Theme License Faq. -
Manual Update ↑ top
There are a few different ways to manually update your theme. We recommend using a child theme if you are going to customize your theme files, as this simplifies updating your parent theme.
Download latest version
Sign in to our website and download the latest version of your theme.
If you don’t have an account, you can create a new one with the email that was used to purchase the theme.Upload the new version
The easiest way to manually update your theme is to upload it via the WP dashboard.
However, if you try to upload a new version of a theme that is already in your site’s themes directory, you will get an error.
The reason is that you already have a theme folder on your server with the same name as the folder inside your ZIP file.
You can do one of the following:1. Delete the theme on your server
- Go to Appearance > Themes
- Activate one of the default WordPress.org themes
- Delete the old theme (Make sure you make a backup just in case something goes wrong)
- Upload new version via Appearance > Themes > Install Themes > Upload
- Activate the new version
If you have done any customizations to your theme files, these customizations will be lost if you use this method.
2. Rename the folder (via FTP)
- Login to your site via FTP or cPanel
- Navigate to wp-content/themes/ and find your old theme
- Rename your old theme something like “theme-old” (replacing “theme” with the name of your theme).
- Upload your new theme folder
The old and new versions of the theme will both appear in the themes interface, but you will be able to distinguish them by their folder names and version numbers.
-
Menu ↑ top
xMag Plus supports four Menu Locations:
- Main Menu
- Top Menu
- Footer Menu
- Social Menu
By default, the Main Menu will fall back to Pages.
To add Navigation Menus in your site go to Appearance » Menus page in your WordPress admin and create or edit a new menu.Create a new menu
- Select “Create a new menu” at the top of the page
- Enter a name
- Click the “Create Menu” button
- Add links to the menu by using the options on the left sidebar
Then at the bottom of the menu structure you will see the Menu Settings, where you can assign your menu to specific locations on your website.
For more details of adding, deleting, and maintaining menus, please visit WordPress Menu User Guide. -
Thumbnails ↑ top
The theme comes with it’s own thumbnails to minimize the page size and increase the page loading speed.
The custom image sizes are:
1200×520 px
460×300 px
740×480 px
We suggest regenerating thumbnails.How to regenerate thumbnails
- Install and activate the Thumbnail Regenerate plugin from here.
- Go to Tools -> Regen. Thumbnails and press the “Regenerate All Thumbnails” button:
- Wait until the regeneration process is 100% done and check your site.
How to Add Post Thumbnails
- Create a new post or edit an existing one
- Scroll down a little to see if there is a meta box called “Featured Image” on the right hand side of the screen.
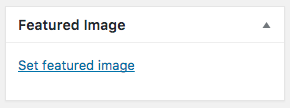
- Click on “Set Featured Image” link. This will open the WordPress Media Uploader.
- Upload an image from your computer or use an existing image from your media library.
-
Colors ↑ top
Go to Appearance » Customize, click on the Colors tab and adjust your site colors.
We create our themes to provide basic color changing options for the links, buttons, highlights, and background.
We have tried to keep the options minimal to reduce the risk of a color disaster.General
- Background Color
- Accent Color
- Text
- Page/Post Title
- Page/Post Text
Header
- Header Background
- Site Title
- Site Tagline
Footer
- Footer Background
Mobile
- Mobile Menu Background
Note: to change navbar background color please visit Header section.
-
Background Image
xMag supports Custom Background, a theme feature that provides for customization of the background color and image.
Go to Appearance » Customize and click on the Background Image tab to upload your custom Background Image. -
Magazine template ↑ top
Use Magazine template
To use the Magazine template you have two ways:
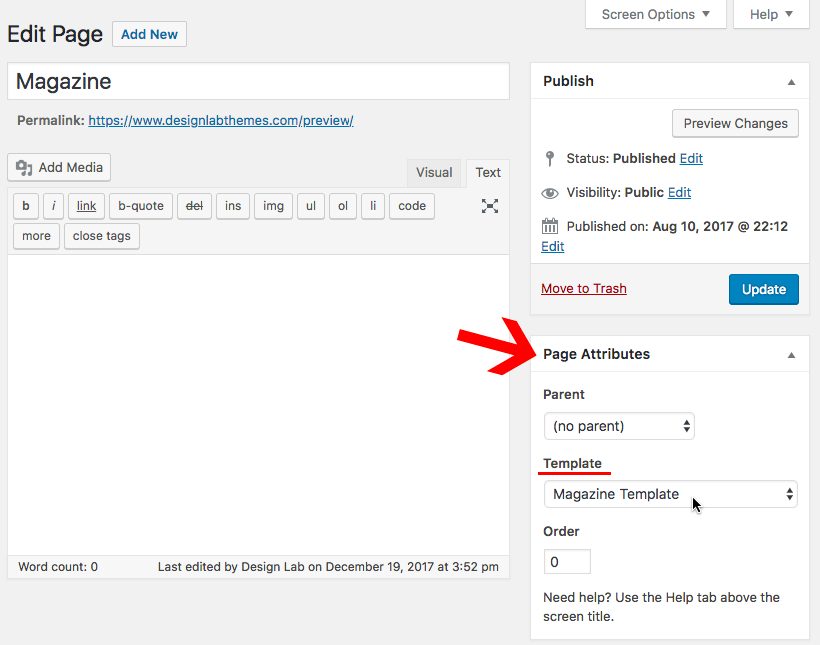
Method 1: Click on “General” tab and check “Enable Magazine Homepage” option.
Method 2: Edit or create a new page and choose the Magazine template in the Page Attributes box.
By default, WordPress shows your most recent posts on the Homepage of your site.
If you want to use your Magazine page as your Homepage:
- Create a new page called Blog (or whatever title you want) and publish the page. You do not need to add any content to this page since it will only display your blog posts.
- Click on Settings » Reading
- Select the option of Static Page
- Select your newly created Magazine page to be the Homepage and your Blog page to be the Posts page
- Click the Save button
Setup Magazine
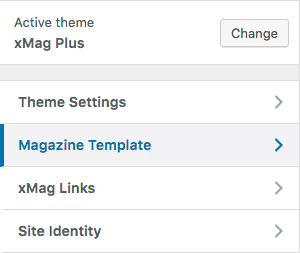
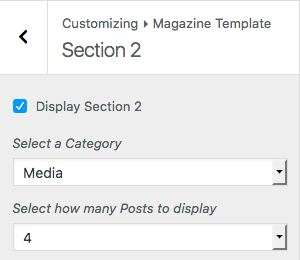
Go to “Appearance » Customize” and click on the Magazine Template Panel.
Magazine Template provides Multiple Content Sections to show Posts filtered by Category.
For this kind of template, you need to have many articles in several Categories.
To change Magazine options click on “Magazine Template » General” tab.
To enable a Content Section simply check “Display Section” option and select category. You can show up to six content sections.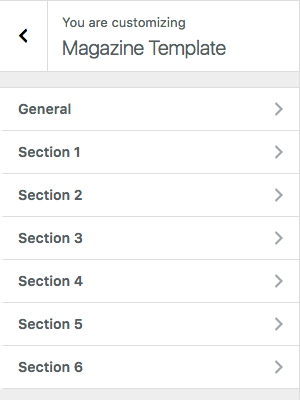
-
Customize Theme ↑ top
This theme makes use of the WordPress Theme Customizer for all your theme options!
To access the Customizer from the dashboard, simply go to Appearance » CustomizeIn “xMag Settings” Panel you’ll find most of your theme options.
Theme Customizer allows you to tweak the theme’s settings and see a preview of those changes in real-time.
After making changes, click the “Save & Publish” button at the top of the Theme Customizer.- General
- Typography
- Header Options
- Header Logo
- Header Image
- Homepage
- Categories & Archives
- Featured Posts
- Post Slider
- Call to action
- Post
- Page
- WooCommerce
- Advertisements
-
General ↑ top
Click on the xMag Settings » General tab.
Layout Style
There are 2 layout styles to choose from: Boxed or Full Width.
Widgets Style
You can change the Widgets appearance: grey background, white background or minimal.
Read More Link
Option to display Read More Link on your Blog and Archives.
Scroll Up button
Option to display a button to scroll up the page.
Footer Text
Display a Custom Text in the Footer. HTML tags are allowed (strong, em, b, i, br, a)
Google Analytics
Add your Google Analytics code.
-
Typography ↑ top
Click on the xMag Settings » Typography tab.
xMag Plus integrates the most popular Google Fonts.Options:
- Font Size (adjust Text font size and Title font size)
- Site Title Font
- Title Font
- Text Font
-
Header Options ↑ top
Click on the xMag Settings » Header Options tab.
xMag offers three different Menu Styles:
Main Menu Style
You can choose a dark style, light style, or change the Main Menu background as you like.
Main Menu Alignment
You can choose between Left or Center Alignment
Other Options
- Sticky Main Menu: you can make your navigation menu stick to top of the browser when your users scroll. This ensures that your navigation menu is always accessible to the user, no matter how scrolled into the page
- Home icon: check this option to display the home icon in the main menu
- Search Form: check this option to display the Search Form in the main menu
-
Header Logo ↑ top
Click on the xMag Settings » Header Logo tab.
Upload your logo by clicking on the Select Image button.
After you upload the logo image, click on Save & Publish button to save the changes.xMag theme comes with additional features to customize your Logo.
Options:
- Max Height (you can set a custom value of pixels, default 30)
- Logo Position (Left / Center)
- Show Tagline under the Logo
-
Header Image ↑ top
For custom header image this theme uses WordPress Custom Header functionality.
Click on the xMag Settings » Header Image tab.
Upload header image using WordPress Media Uploader or select image which is already uploaded and click on the Publish button. Suggested size is 1920 × 360 pixels.You can change Header Image Width and Height to create an impressive header area.
We’ve included options to turn on/off Header Image on mobile and to display Header Image on Front Page Only. -
Homepage ↑ top
Click on the xMag Settings » Homepage tab.
The Xmag Plus theme supports 11 different layouts for the Blog Index Page (the Homepage displays “Your latest posts”):Options:
- Small Thumbnail + Sidebar
- Medium Thumbnail + Sidebar
- Large Thumbnail + Sidebar
- Two Columns + Sidebar
- Two Columns Full Width
- Three Columns Masonry
- First Large Post then List + Sidebar
- First Large Post then Grid + Sidebar
- Mixed: Large Post, List + Sidebar
- Mixed: Large Post, Grid + Sidebar
- Full Content Post + Sidebar
Excerpt length
You can change the excerpt length (default 25 words).
-
Categories and Archives ↑ top
Click on the xMag Settings » Categories and Archives tab.
The Xmag Plus theme supports 7 different layouts for Category, Tag, Search results, Author and Archive Pages:
Options:
- Small Thumbnail + Sidebar
- Medium Thumbnail + Sidebar
- Large Thumbnail + Sidebar
- Two Columns + Sidebar
- Two Columns Full Width
- Three Columns Masonry
- Three Columns
Excerpt length
You can change the excerpt length (default 25 words).
-
Featured Posts ↑ top
Click on the xMag Settings » Featured Posts tab.
Featured Posts are used to highlight some content to your visitors. If enabled, featured content will appear on the Homepage.
This section will feature Posts with user-defined tags (separated by a comma, default tag is “featured”) or sticky posts.Featured Posts display the Post Titles over the Thumbnails. To adjust image size we suggest to regenerate your thumbnails.
-
Slider ↑ top
Click on the xMag Settings » Slider tab.
Check “Display Slider” to add Posts Slider in the Homepage.
You can choose between “Classic Slider” or “Carousel”. You can add a filter by category and select the number of posts to display.
To make the Slider work you need to add Post Thumbnails.
How to add Post Thumbnails -
Call to action ↑ top
Click on the xMag Settings » Call to action tab.
Check “Display Call to action” to add Call to action to the Homepage.
You can add a title, some text and a link. -
Post ↑ top
Click on the xMag Settings » Post tab.
Check “Display Featured Image” to add Post Thumbnails to your Posts.
You can choose between default or Full-width size.
Adjust the Layout as you like (Sidebar or Full width).Other Options:
- Display Post breadcrumbs
- Display Categories
- Display Tags
- Display Related Posts
- Display Author Bio
-
Page ↑ top
Click on the xMag Settings » Page tab.
Check “Display Featured Image” to add Post Thumbnails to your Pages.
You can choose between default or Full width size.Other Options:
- Display Page breadcrumbs
-
WooCommerce ↑ top
Click on the xMag Settings » WooCommerce tab.
Build your online shop with WooCommerce, a free and extendable eCommerce plugin.xMag Plus supports a custom Shop Sidebar, to add widgets in the Shop, Product Category and Page Product pages.
Shop and Product Category Layout:
- Sidebar
- Fullwidth
Page Product Layout:
- Sidebar
- Fullwidth
Cart, Checkout and Account are standard pages. To hide the sidebar apply the “Full width” Template to the page.
Other Options:
- Display Cart Link in the Main Navbar
- Add to cart and Checkout Background Color
-
Advertisements ↑ top
Click on the xMag Settings » Advertisements tab and paste your Ad code.
The theme offers three positions where you can add your Ad code: Above Post Content, Below Post Content and at the top of the Sidebar.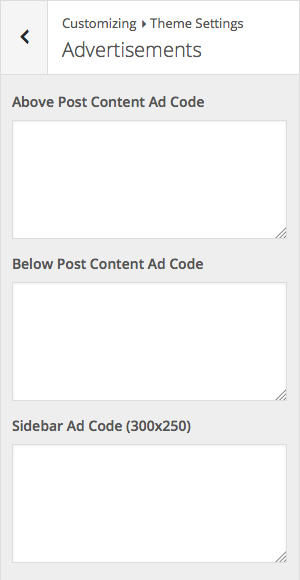
-
Social Links ↑ top
To setup your Social Links, go to Appearance » Menus.
Enter a name for your menu and add social links to the menu by using the option “Custom Links” on the left sidebar. You have to enter a valid URL and a label. Here the list of social icons:- dribbble
- flickr
- medium
- google+
- stumbleupon
- tumblr
- youtube
Then at the bottom of the menu structure, you will see the menu settings and check “Social Menu” to assign your menu to Social Menu location on your website.
The theme will display the Social Menu at the top of the right sidebar. -
Widgets ↑ top
xMag comes with different widget areas you can use to customize your site.
Sidebar – Widget area on the right side of the web page.
Footer – Widget area in the footer of your site. There are three widget columns that you can use to add widgets to the footer.
To set up widgets, go to Apperance » Widgets and use the drag and drop interface to insert widgets into the desired widget areas.
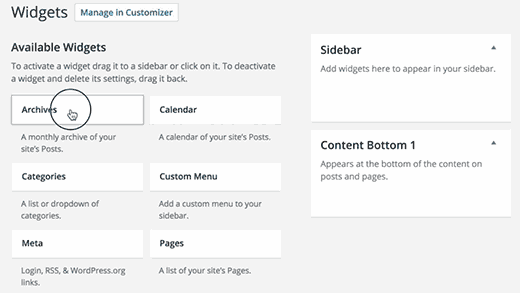
You can also click on a widget title from the list of the available widgets. WordPress will show you the list of sidebars where you can add this widget.
Simply select the sidebar where you want to add the widget, and then click on Add widget button to add it.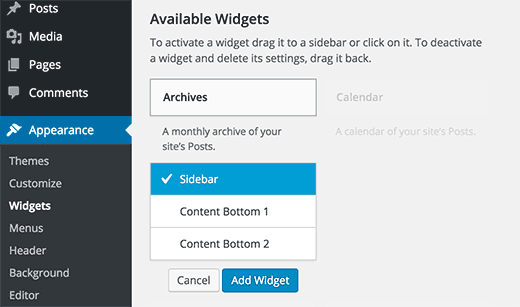
As an addition to the built-in WordPress widgets, xMag Plus also has 6 custom widgets:
- Banner Widget
- Image Widget
- Profile Widget
- Recent Posts Widget
- Social Links Widget
- Video Widget
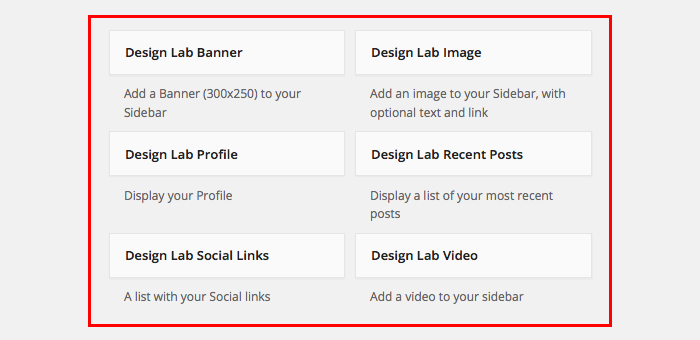
1: Banner Widget
Use this Widget to add a Banner (300×250) to your Sidebar.
2: Image Widget
Image Widget allows you to show an image, with optional text and link.
3: Profile Widget
Profile Widget displays your profile: short bio, an image and Social Links.
Options:- Image size (Medium or Thumbnail)
- Link
4: Recent Posts Widget
Recent Posts Widget allows you to show your recent posts.
Options:- Filter by Category: select All Categories or filter posts by a category
- Number of posts to show
- Show excerpt: check this option to show post excerpt
- Show thumbnail: check this option to show thumbnail
5: Social Links Widget
Social Links Widget allows you to show social links with icons.
6: Video Widget
Video Widget allows you to show a video and a description. To embed a video enter its URL, for example:
https://www.youtube.com/watch?v=GGOksApHzeo
-
Full width Page Template
To have a Full width Page and remove the Sidebar go to your Page editor. On the right side you’ll see a box named “Page Attributes”, select “Fullwidth Page Template” and then update the page.
-
Translation ↑ top
xMag comes with POT file included under the wp-content/themes/xmag/languages folder.
(For xMag Plus Theme the slug is xmag-plus)Method 1:
To translate a theme into your language, follow these steps:
- Log into WordPress Admin and install Loco Translate plugin:
https://wordpress.org/plugins/loco-translate/ - Make sure the following folder exists on your site, and is writeable by the web server:
wp-content/languages/themes - In the WordPress Dashboard go to “Loco Translate » Themes” and find the Theme in the list
- Click on “New language” link
- Choose language and “System” location
- Add your translations and save
If you have automatic updates enabled then the
wp-content/languagesfolder probably exists already. Thethemessubfolder is there to protect your custom translations from automatic translation updates.
Loco Translate also lets you save translations inside the theme’s folder (“Author” location), but this is provided for theme developers only.Note: Files inside the theme folder will get deleted by WordPress updates.Please visit Plugin Documentation.
Method 2:
- Download and install the free application Poedit
- Open Poedit and click on File -> New catalog from POT file in the main menu and select the POT file in your theme’s languages folder.
- A properties box will open up where you must enter the language name you want to translate. ( the default for English it’s en_US ; for English (UK) it’s en_GB ; for French it’s fr_FR ; for German it’s de_DE.po)
Each language and country has a specific code you will need to use when saving translation files.
Languages list can be found here - Save your new language file, a new .mo file should be created.
- Upload the generated .mo and .po files into your xmag/languages folder on your live site.
- Save a backup of these files somewhere safe. If you upgrade the theme from WordPress admin, the language files will have to be re-uploaded.
How to configure your WordPress language
Go to Settings -> General in the WordPress Dashboard and scroll to the bottom.
You should see a dropdown list with the label “Site Language”. Select Site Language and save.
Changing this will set a new default language for all site visitors. - Log into WordPress Admin and install Loco Translate plugin:
-
Additional CSS
xMag supports Additional CSS feature (added in WordPress 4.7).
Click on the “Additional CSS” tab from the left panel.
You’ll find a simple box where you can add your custom CSS. As soon as you add a valid CSS rule, you will be able to see it applied on your website’s live preview. -
Child Themes ↑ top
You can use it to edit and customize your own theme, without losing your customizations when you update the theme.
About child themes: WordPress Child Themes

